Monday, April 30, 2012

Indie Authors on Google Hangout


Hey Authors! I'm a part of a great new informative show called Indie Authors. It's on the new, very cool, Google Hangout Network. Each week we record a show, on Monday. We are up to show eight.

The shows are packed with information from Indie Authors. Some that have been on the Indie Trail for a couple of years now, and some fresh off the press. That way you get to see this process from many angles.

The show varies from week to week on what we discuss and suggestions are always welcome. Each panel member will be asked a question by our great host Jason Matthews, or co host AC Cruz, and they will, along with other panel members, give us their take on a given subject. I truly think this is a new wave of broadcasting that could possibility one day be picked up by some cable companies.

Here is a shot from one of our shows.


The information is free, informative, and I myself learn something new and creative every week. Tonight's show will be about marketing. We'll talk about marketing locally, and also about marketing online. The show always lasts about an hour, and it's so much fun. I think it would be good homework for any Indie author, to take time out of your busy day to watch the show.

If you want read more about the show check here to watch some past shows check them out here . Panel guest and information here.

If you like the show please like and share on the U tube link.

The show is still new and growing, for more up to date information go here. To be a guest on the show contact our host. Jason Matthews

Thanks for watching
Samantha Fury

Monday, April 23, 2012

Allergies & Writing

You may say what. Has Samantha lost her mind. What could Allergies and Writing possibly have in common. Well, to be honest, they may not have a lot in common but they both have plagued me this week. So I'm telling you all about.

First of all, they both can hit you at a moments notice. You're not expecting this visit either from your muse or your Allergy Fairy. You may be standing in a line waiting to pay a bill or buy stamps and something happens that triggers a sneeze or a story idea.

What do you do? Grab a tissue if it's the sneeze, but if its a story idea you try to hold it off until you can find a pen and something to jot some notes on. But the story is coming fast and you're getting the first few lines and there's nothing to write on!

You look to your right and then left, but everywhere you look there is no paper. You have a pen in your purse, or maybe you'll steal the postmasters pen. As you're searching the story line is growing, and you're frantic that if you can't hurry and write some of this down it will be gone forever.

Isn't it strange how the muse works. It wants what it wants, where it wants. So always have a pen and paper, or a mp3 recorder, or in my case all of the above and some allergy medicine, hidden away in your coat pocket.

I hated to let you guys go without a new blog, for this Monday, and though this isn't much. It may save you a trip to the doctor or gain you, that next bestseller.

Happy Writing
Samantha

Tuesday, April 17, 2012

Microsoft Word Page Formatting

Hi friends,

I'm going to veer away from covers for today. I've been asked many times. How many chapters does x amount of words equal. Well every good Author needs to know as much as possible about Word, or whatever software you may use. I always know what chapter I'm on, what page I'm on and do an brief chapter outline so I don't go overboard when writing a novel. 

 An author needs to know how many words, or chapters that they are shooting for. In Romance and Mystery it seems to be 85 to 97 thousand words. Most of the time for me that equals out being about 53 chapters or up.

 I like short quick chapters with a zinger at the end of each chapter to leave the reader wanting more. Also short chapters are very helpful, in giving today's busy reader, jumping off points. 

 It also helps them feel as if they are reading a lot and getting something accomplished if they can go away from their e-reader feeling as if they've read several chapters. It may even make them want to buy your next book, if they feel it was an easy read. So onto the point of knowing how many words equals a chapter. I format my paperbacks 6 x 9. I always have word set up to reflect this. This seems to work well for paperback and my e-books. 
Why go with a 6 X 9

I seem to find that the standard book size is six inches wide and nine inches tall 6 X 9. I've read that your book will probably be cheaper to print, easier to read, and easier to sell if going with the 6 X 9. One reason because it will fit on most bookstore shelves.

Larger books can be harder to hold, carry, or put on a shelf.

The cover of a 6 x9 book is larger than a 5.5 x 8.5 book. The cover is your advertising space so you want the best available book size.

I've printed two books with this format and it seems to work well. Go to file and page-set up and use these settings below for a 6 x 9 paperback novel.

Here are some images to help you set your M-Word so you know how many chapters you have and at what page you are on in your current Novel.

First set your Margins.


Then your paper size. This will be the size of your book if you chose a 6 x 9 paperback.


Lay Out Paper Source

Now you will need to add page numbers. Go to Insert and down to page numbers and chose your settings.

I hope that this helps you. It's always good to get a proof with every book to make sure that everything is aligned correctly and that your cover looks well. In this instance with word you can use the percentage tab to make sure things look just as you wish them too.

I hope this helps!!! Samantha come back Monday to learn something new and exciting to help you be a better Author.

Thursday, April 12, 2012

Making a Cover Lesson 3


This is an old post and I'm making better covers now and selling them too if you need a cover contact me here or want to learn more join one of our groups. 

Hey there. We are going to talk today about making your own e-book cover. Most of the time for my e-books I start one side of my Create Space paperback template. A friend of mine suggested, also try and get high resolution images, rather than getting images that fit and are at a lower resolution.

Finding the perfect image can be the hardest step in making a cover. Especia
lly if you are going to use more than one image.

I always suggest to purchase your images for book covers. I don't mind using free images for book trailers and websites, but for covers, even e-book covers I always purchase my images. Be sure and go with a reputable site so you can feel safe, that the mode
l-release is in order. I normally buy from iStockphoto, BIGSTOCK, or Dreamstine. and now Depositphoto  They are the three best in my opinion.

Most of the time you can down load a free image, and see if you think it will work on your cover. There will be a logo on the picture, until you purchase the image. Sometimes it's hard to get a good grasp of what the cover will look like with the logo, but do the best you ca
n. Always remember this is a business and you need to stay within your budget.

For e-books dimensions and more detailed information go to Amazon's Guide

Amazon's Guide begins by saying . . .
Dimensions for the size of your cover art:
Minimum of 1000 pixels on the longest side
Ideal height/with ratio of 1.6
Jpeg, or .jpeg
Tiff, or .tif(f)
For better quality, we recommend that images be 2500 pixels on the longest side. (I think these have changed now in 2014 please check Amazon's Guide)

When you are ready to start, open your software, and if you have a Create Space template, find where you have saved your template then open that file. It will look like this below. I am using a free trial from adobe, check it out here. You won't need the whole template if you are only making an e-book.


Next pick an image. You open the two or three files you want, and drag them both onto the template file, it will look like this. We will be using the right side of the cover only since we are only talking about e-book covers. I have chosen three photo's at random. The first picture will be our first layer, the blue sky with the tree. Also when making an e-book cover only, the bleed area is not important. When we are done we will hide or delete the template and save the image to our computer.

Now you select the first layer, then drag in into the cover, and once you have stretched it to the size of the cover you chose select again. This is where the pixels come into play. The smaller you go the more distortion you get, and the less quality you have, but with e-books I find you can go pretty low and still have a nice picture. Check your amazon guide line to chose the correct size of your picture.

I have cut out the second layer by using the round marquee tab. I will now pull this layer over and place it in the spot I wish, this will be layer two. The picture of the guy will be layer three. Name and title layers four and five.

Now, I will add the title and my name, and for a shadowy effect I will add two layers of each of the pictures of the man and woman. I have taken the opacity down on both of the first images of the man and woman and saved them. Then I added a se
cond layer with a 100 percent opacity, of each of them and saved the image once again.
I know this is a fast lesson, and I hope to do this again with some video sometime. The best way to learn, is to start using your software, and learning all you can about layers. They can really make a cover look a lot better. Once you are done you go back to your layer tabs and hide or delete the layers you don't want. Then you save your image.
When you are done you get a nice looking image. I didn't do much with making sure lines were perfect and the font was just right. This was just a quick example of what you can do when a few nice pictures, and some very handy software.

Below is a look at my first book cover. I have five layers of Angel to get him just the way I wanted, with his arms crossed and that shadowy look behind him. I think when all was said and done there was about ten layers of Charlie (the redhead) and those red curls. But you would never know by looking. Thanks for joining me and check back with us Monday
to our next lesson on layers.
Samantha Fury


Monday, April 9, 2012

Making a cover lesson 2

I hope that everyone had a good weekend, and that you are rested and ready to work. My back decided to go out Saturday, which it does now and then so this post may be brief. There are so many things you can learn to do, in order to make a great book cover, and I'm learning myself as I watch more u tube videos and read more blogs.

So lets start with software. I know you're like me you want to jump in and make a cover but we need to talk about the tools of the business first. Some are free, some are complicated and some are very expensive. An author needs to wear many hats, and one of them is book keeper, and time manger.

You need to decide. Is it worth it to make my own covers. Do I want to spend the time necessary to do this, or would I rather be writing or spending time with my kids, or dogs. :) Do I have the time that it takes to make a good cover or should I just buy one. There are many nice places to buy covers and later. we'll spend some time on that topic.

The next question that the bookkeeper in us all needs to ask, is what can I afford. Am I making enough money from my books to buy software at this time? Maybe you already have software, if not, try looking for something free. Once you find out if you have the ability to make good covers, then you can decide how much money to spend.

I was blessed to have adobe Photoshop elements 2.0, (we got it with a camera we purchased years ago) it did everything I needed, until I did an upgrade and lost XP. Now I'm using three different kinds of software. I still have PS elements 2.0 but with 7, I have to use it in compatibility mode, and it's just not the same. I'm trying, with the free trial, Adobe Photo Shop 13. beta and Pixlr.

Pixlr is an online free service that allows you to set up an account and save your work online, or to your computer. It's a lot like adobe photo shop and I like it, but I prefer software to be on my computer, where I can feel a bit more safe, that no one can see, or steal my work. I'm loving the free trial of PS 13 from adobe, and more than likely will purchase this.

I do enjoy making my own covers, but may purchase a few, here and there, when I don't have the time to do the work myself. As Mr. Eastwood said in the movie, Magnum Force, 'A man needs to know his limitations.' Well we authors need to know ours also. So if you are not good at something, find someone that is.

If you don't like to, or can't figure out how to make a good cover, then check your budget and find out how much you can spend on a cover. It maybe that you don't want to spend the time learning, to make a cover. Making a good cover, can take time. I've been known to spend as much as two months searching for the right picture.

So I'm going to bring this little blog to a close, and I hope you will check out the Adobe Free trial. here If you have any questions please post them and we'll try to get to them asap. For now until my back gets back to normal I'll be blogging twice a week. Monday and Thursday.

Thanks for joining us today. Our next lesson will be on making a cover and we will try to touch on layers. Be sure and check out my book covers below.

Samantha Fury
Author of Street Justice Series
Book 1 Charlie's Angel Link
Book 2 Tidal WAve

Thursday, April 5, 2012

Making a book cover with CreateSpace Lesson 1


I'm never much for introductions. I like to jump right in and see what we can learn so here we go. I've had a lot of people asking me of late, about making book covers with CreateSpace. One way to do this is to use their cover creator. It's easily done, and is a great way for new writers to get started on making covers. Below is some examples of what you will have to pick from. They now have over 30 options. You just click the one you would like to try and press OK.


CreateSpace leaves no room for errors, by allowing you to use these pre-made covers, with a kind of fill-in-the-blanks format, and gives you many options to pick from in making your cover your own. You can see the options below. Each tab opens up with options to detail the cover, with your own preferences.


After you have filled in all of the options: name, title, look, font, images you can get something that looks like the first cover I made. This book is a 6 x 9 (this book is not available yet)


If you are happy with your cover you just follow the step-by-step instructions to submit this cover for your paperback book.

For my second book I wanted to be a bit more creative so if you chose to do that also here are the steps in making your own cover. I suggest that you find a software to help you build this cover. Adobe 2.0 essentials is great, but it's not free. There is some pretty good free software and we'll talk about those on a later blog.

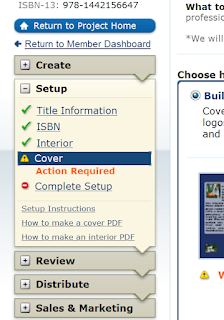
Bur for now let's get that template built. So go to the cover section of your CreateSpace book account and look for the how to make a cover pdf . . . see image below. The link is two lines below Complete Setup.

If you have trouble finding it try this link here


Once you click the link, you will need to skip down to download our cover templates. You will need to know how many pages your novel is, so the template can calculate your spine width. You can learn this by using M word and enameling page numbers. The screen will look like this. If you are to the point of making your own cover I can assume you know what size your book is. If not a lot of writers choose the 6 x 9 trim size.


Once you are here and you've made all your choices you click Build Template and then once it's download it to your computer. You will need to unzip the file and there will be your template. It will be in two forms, pdf and png. You can drag it out of your zip file so you can place it in adobe, or what ever software you will be using.


Come back for another blog lesson tomorrow on software and layers. If you are like me you will have a love hate relationship with creating layers, but no cover really works well without the author of the cover understanding layers.


 Here are some more links on this topic

Welcome to my blog

Welcome to my blog. Mom just got home from getting 5 new stichtes. Here I am going to bed at 6 a.m. Not a good thing. I hope to soon get som...